Dual-write – Step by Step guide


Really helpful

Prem's Dynamics 365 Blog

Dual-write
is an out-of-box infrastructure that provides near-real-time interaction between model-driven apps in Microsoft Dynamics 365 and Finance and Operations apps. When data about customers, products, people, and operations flows beyond application boundaries, all departments in an organization are empowered.

Prerequisite:

Dynamics 365 for Finance and Operations & Dynamics 365 Sales should be installed. You can also use LCS approach to deploy & configure Dual-write.

  • Finance and Operations apps that have build version 10.0.9 (10.0.383.20013) (Quality update) and platform update 33 or later.
  • Model-driven apps in Microsoft Dynamics 365 that have platform version 9.1.0000.11732 or later.

Deployed the CRM Trial Instance (I have used the trial instance for this demo)

Please refer the prerequisite before starting the installation:

  • Uninstall the Prospect to Cash (P2C) solution.
    The P2C solution doesn’t work concurrently with dual-write. Therefore, don’t install the P2C solution. If it’s already installed, you must uninstall it before you enable…

View original post 1,094 more words

Guide for Power Automate


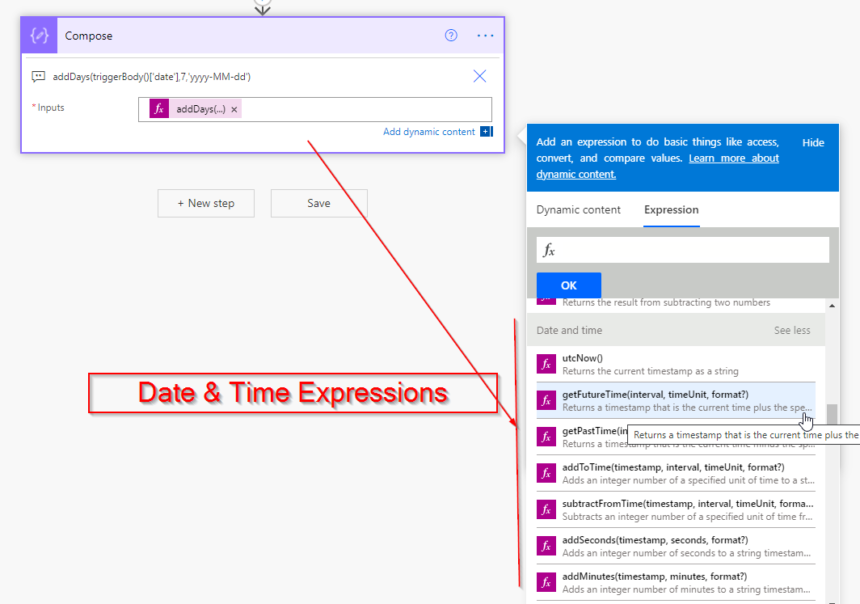
Date and Time field manipulations are very common in business applications. In Power Automate we can use a list of Data & Time related expressions to manage data time fields. In this post we will discuss all expressions about data and time field expressions.

The below is the list of data & time expressions available in Power Automate. The Date Time fields expressions use format as common parameter to understand all formats of date time refer here Standard Formats & Custom Formats.

The below examples are constructed by taking a variable “Initial Date“.

The date taken as source date is “2021-09-13T00:00:00Z” (year-month-dayThh:mm:ssZ)

ExpressionsDescription
addDaysThis function is used to add number of days to an existing timestamp. You can also use negative number to deduct days.
Syntax addDays('<timestamp>', <days>, '<format>'?)
Ex : addDays(variables(‘Initial Date’),7,’f’)
Ex : addDays(variables(‘Initial Date’),-7,’f’)
addHoursThis function is used to add number of hours to an existing timestamp. You can also use negative number to deduct hours.
Syntax addHours('<timestamp>', <hours>, '<format>'?)
Ex : addHours(variables(‘Initial Date’),5,’f’)
Ex : addHours(variables(‘Initial Date’),-5,’f’)
addMinutesThis function is used to add number of minutes to an existing timestamp. You can also use negative number to deduct minutes.
Syntax addMinutes('<timestamp>', <minutes>, '<format>'?)
Ex : addMinutes(variables(‘Initial Date’),5,’f’)
Ex : addMinutes(variables(‘Initial Date’),-5,’f’)
addSecondsThis function is used to add number of seconds to an existing timestamp. You can also use negative number to deduct seconds.
SyntaxaddSeconds('<timestamp>', <seconds>, '<format>'?)
Ex : addSeconds(variables(‘Initial Date’),6,’f’)
Ex : addSeconds (variables(‘Initial Date’),-6,’f’)
addToTimeThis function adds a number of time units to an existing timestamp. You can also use negative number to deduct timestamp.
Syntax : addToTime('<timestamp>', <interval>, '<timeUnit>', '<format>'?)
Ex: addToTime(variables(‘Initial Date’) , 1, ‘Day’)
Ex: addToTime(variables(‘Initial Date’) , -1, ‘Day’)
You can use time unit as : “Second”, “Minute”, “Hour”, “Day”, “Week”, “Month”, “Year”
convertFromUtcThis function converts an existing timestamp from Universal Time Coordinated (UTC) to the target time zone. For all Time zone codes see here.
SyntaxconvertFromUtc('<timestamp>', '<destinationTimeZone>', '<format>'?)
For example if you want to convert UTC to EST then you have to use like below.
Ex : convertFromUtc(variables(‘Initial Date’) , ‘Eastern Standard Time’,’f’)
convertTimeZoneThis function converts a timestamp from the source time zone to the target time zone.
Syntax : convertTimeZone('<timestamp>', '<sourceTimeZone>', '<destinationTimeZone>', '<format>'?)
Example : If you want to convert from India Standard Time (IST) to Eastern Standard Time (EST) then use the expression as below:
Ex:
convertToUtcThis function converts an existing timestamp to Universal Time Coordinated (UTC). For all Time zone codes see here.
SyntaxconvertToUtc('<timestamp>', '<sourceTimeZone>', '<format>'?)
For example if you want to convert IST to UTC then you have to use like below.
Ex : convertToUtc(variables(‘Initial Date’) , ‘Indian Standard Time’,’f’)
dayOfMonthThis expression return the day of the month from an existing timestamp.
SyntaxdayOfMonth('<timestamp>')
Example : This example returns the number for the day of the month from this timestamp:
dayOfMonth( variables(‘Initial Date’)) It returns this result: 13
dayOfWeekThis expression return the day of the week from an existing timestamp.
SyntaxdayOfWeek('<timestamp>')
Example : This example returns the number for the day of the week from this timestamp:
dayOfWeek(variables(‘Initial Date’)) It returns this result: 1
NOTE : The day of the week from the specified timestamp where Sunday is 0, Monday is 1, and so on
dayOfYearThis expression return the day of the year from an existing timestamp.
SyntaxdayOfYear('<timestamp>')
Example : This example returns the number for the day of the year from this timestamp:
dayOfYear(variables(‘Initial Date’)) It returns this result: 256
formatDateTimeThis expression returns the date format from a timestamp. Example to display in “yyyy-MM-dd” format then you have to pass like below:
formatDateTime(variables(‘Initial Date’),’ yyyy-MM-dd ‘)
getFutureTimeThis Return the current timestamp plus the specified time units.
getFutureTime(<interval>, <timeUnit>, <format>?)
getFutureTime(5, 'Day', 'D')
This returns the timestamp by adding 5 days to the current date.
getPastTimeThis Return the current timestamp minus the specified time units.
getPastTime(<interval>, <timeUnit>, <format>?)
getPastTime(6, 'Day', 'D')
This returns the timestamp by substracting 6 days to the current date.
startOfDayReturn the start of the day for a timestamp.
startOfDay('<timestamp>', '<format>'?)
startOfDay('2018-03-15T13:30:30Z')
this returns “2018-03-15T00:00:00.0000000Z”
startOfHourReturn the start of the hour for a timestamp.
startOfHour('<timestamp>', '<format>'?)
startOfHour('2018-03-15T13:30:30Z')
And returns this result: "2018-03-15T13:00:00.0000000Z"
startOfMonthReturn the start of the month for a timestamp.
startOfMonth('<timestamp>', '<format>'?)
startOfMonth('2018-03-15T13:30:30Z')
This example returns the start of the month in the specified format for this timestamp:
subtractFromTimeSubtract a number of time units from a timestamp.
subtractFromTime('<timestamp>', <interval>, '<timeUnit>', '<format>'?)
subtractFromTime('2018-01-02T00:00:00Z', 1, 'Day')
The unit of time to use with interval: “Second”, “Minute”, “Hour”, “Day”, “Week”, “Month”, “Year”
ticksReturn the ticks property value for a specified timestamp.
ticks('<timestamp>')
ticks(variables(‘Initial Date’))
utcNowReturn the current timestamp as a string.

Reference : https://softchief.com/2021/09/13/use-of-date-time-expressions-guide-for-power-automate-complete-tutorial/

Datetime to Date in SSRS


This is an visual Studio SSRS report development issue that relates to Dynamics products when developing Reports. On this writing I will refer to Dynamics AX context.

Occasionally after deploying a report with a date data field value from Dynamics Ax I realized that when viewing the report, the field will show a date-time value with the time defaulted to 12:00:00 am as shown below;

Date 1/30/2021 01:00:00 PM

At first i though the issue was from the system, so to check i made my temporary table for the report regular, ran the report and checked the value in the temporary table. I realized the value was in Date format which lead me note that this was an SSRS issue.

So my work-around this issue is to open the report in Visual Studio SSRS designer. Open the expression value of the respective textbox and add format function as shown below;

expression

After making this change and publishing the report, running it will now show the desired value for the field as shown below;

30-01-2021

Load context-sensitive Power BI tiles in Dynamics 365 Finance via Power Apps


ErpCoder

Power BI goes hand in hand with Dynamics 365 Finance and Supply Chain Management. By default Power BI can be used within workspaces and Dynamics 365 comes with a data warehouse and a large set of reports and dashboards. But wouldn’t it be nice to show Power BI visuals in common forms and filter on the active record? This can be done without coding by using Power Apps:

D365 Parameter to Power BI filter

Dynamics 365 Finance is capable to load Power Apps and pass parameters to the App, while Power Apps can load PowerBI reports and pass a filter to Power BI.

Create a Power BI report

Create a report that can be drilled down to the granularity you want to display in Dynamics 365 Finance. For example if you want to show customer specific information, your report should support filtering on a customer account.

For example I’m using…

View original post 545 more words

Automatically stop/start AX Azure VMs


coderscove

(Updated 3/12/2017: Fixed issue in script – code updated below)
As you probably know, AX7 (or as it is called now ‘Microsoft Dynamics 365 for Operations’ – rolls off the tongue so nice!), is hosted on Azure.

We currently also have an AX2012R3 instance running on Azure.

With Azure, you are pretty much billed by the hour. If your VM is running, then you are paying. So it makes sense to shut down the VM’s on off-hours.

In Azure you can use PowerShell scripts to automate things like this. You run these scripts through the ‘Runbook’ option in the Azure portal.

So I decided to spend some time on getting this to work. I don’t have much experience with Azure, so I used the great, all knowing World Wide Web for a little help.

This post was instrumental on getting started:

Azure is very much in development, much like…

View original post 751 more words

Read File’s from SFTP Server and Write data in AX365 (PART 1)


In Part 1, will create a project with basic SFTP functionality which we will use in AX in Part 2

Basic Step is to add the Parameters to set the SFTP details.

Tips:

If we are using Port 22 then no need to use a prefix of SFTP in your Host because 21 is for FTP and 22 is for SFTP

Your File path should start from the directory root folder not from the SFTP server name.

To connect to the SFTP Server. I used SSH.NET Dll.

Create a New C# Library project, Right Click on your project, click on Manage NuGet Packages and Install ssh.net In your project. It will add a reference of DLL into your project.

Add a reference of this dll in your class

using Renci.SshNet;

Now we need to write a method to make a connection,

1
2
3
4
5
6
7
8
9
10
11
12
13
public SftpClient OpenSFTPConnection(string host, int port, string username, string password)
{
    if (this.sftpClient == null)
    {
        this.sftpClient = new Renci.SshNet.SftpClient(host, port,      username, password);
    }
   if (!this.sftpClient.IsConnected)
    {
        this.sftpClient.Connect();
    }
    return this.sftpClient;
}

This method will return all the files present in the directory

1
2
3
4
public List<string> GetDirectories(SftpClient _SftpClient, string path)
{
        return _SftpClient.ListDirectory(path)/*.Where(n => n.IsDirectory).ToList();
}

This method will return the stream which we can use to read the content of the files.

public Stream DownloadFile(SftpClient _SftpClient, string sourcePath)
 {
        var memoryStream = new MemoryStream();
        _SftpClient.DownloadFile(sourcePath, memoryStream);
        memoryStream.Position = 0;
        return memoryStream;
}

I also got a requirement to move files to a different folder after writing data in AX. Below method will do that magic.

1
2
3
4
public void MoveFile(SftpClient _SftpClient, string sourcePath, string destinationPath, bool isPosix)
{
        _SftpClient.RenameFile(sourcePath, destinationPath, isPosix);
}

Final Code for our library project will look like this

1
2
3
4
5
6
7
8
9
10
11
12
13
14
15
16
17
18
19
20
21
22
23
24
25
26
27
28
29
30
31
32
33
34
35
36
37
38
39
40
41
42
43
44
45
46
47
48
49
50
51
using Renci.SshNet;
using System;
using System.Collections.Generic;
using System.IO;
using System.Linq;
using System.Text;
using System.Threading.Tasks;
namespace MySshNet
{
    public class sftpConnection
    {
        public SftpClient sftpClient;
        public SftpClient OpenSFTPConnection(string host, int port, string username, string password)
        {
            if (this.sftpClient == null)
            {
                this.sftpClient = new Renci.SshNet.SftpClient(host, port, username, password);
            }
            if (!this.sftpClient.IsConnected)
            {
                this.sftpClient.Connect();
            }
            return this.sftpClient;
        }
        public List<string> GetDirectories(SftpClient _SftpClient, string path)
        {
            return _SftpClient.ListDirectory(path)/*.Where(n => n.IsDirectory)*/.Select(n => n.Name).ToList();
        }
        public void MoveFile(SftpClient _SftpClient, string sourcePath, string destinationPath, bool isPosix)
        {
            _SftpClient.RenameFile(sourcePath, destinationPath, isPosix);
        }
        public Stream DownloadFile(SftpClient _SftpClient, string sourcePath)
        {
            var memoryStream = new MemoryStream();
            _SftpClient.DownloadFile(sourcePath, memoryStream);
            memoryStream.Position = 0;
            return memoryStream;
        }
    }
}

Now Just build your project then go to your projects bin\Debug folder and copy both Dll’s. paste the DLL’s to your AX extension Bin Folder so we can use it in our AX project.

Tips:

We need to add our Dll’s in our extension Bin folder so It can go through with check in to the next environments.

Reference: https://dynamicsax4u.wordpress.com/2020/08/18/read-files-from-sftp-server-and-write-data-in-ax365-part-1/?blogsub=confirming&blogsub=confirming#subscribe-blog

HcmPositionHirarchy To whom position needs to report in upper ranking in D365 FinOps


static void AlfPositionHirarchyUP(Args _args)
{
HcmWorker                   HcmWorker;
HcmPositionWorkerAssignment HcmPositionWorkerAssignment;
HcmPositionHierarchy        HcmPositionHierarchy;
HcmPositionRecId            positionRecId;

positionRecId = HcmPosition::findByPosition(HcmWorker::      findByPersonnelNumber(‘701027’).primaryPositionId()).RecId;

while(positionRecId>0)
{
select * from HcmPositionHierarchy
where HcmPositionHierarchy.Position ==positionRecId;

positionRecId=HcmPositionHierarchy.ParentPosition ;
if(HcmPositionHierarchy.ParentPosition)
{
info(HcmWorker::find(HcmPosition::getReportsToWorker(HcmPositionHierarchy.Position)).name());
}
}

}

Get Schedule Batch job date and time


/// <summary>
/// Gets the scheduled date and time of job.
/// </summary>
/// <returns>
/// Scheduled date and time of job.
/// </returns>
public UtcDatetime scheduledDateTime()
{
BatchJob batchJob;

select firstonly OrigStartDateTime from batchJob
where batchJob.RecId == BatchHeader::getCurrentBatchTask().BatchJobId ;

return batchJob.OrigStartDateTime;
}

Create Azure Connector for Lifecycle Services


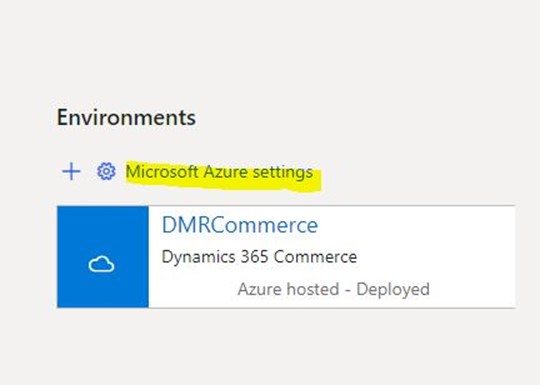
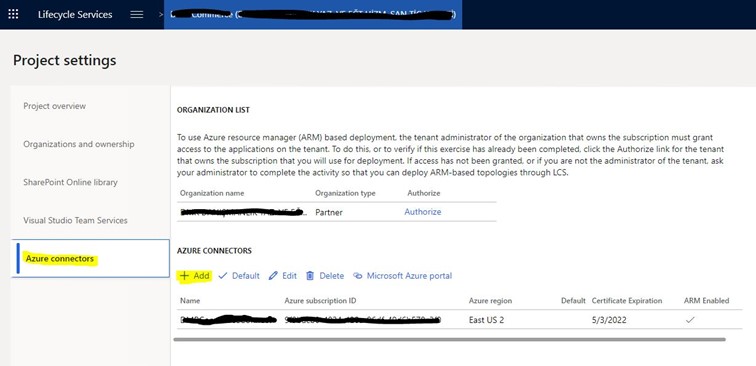
 how to set up the Azure connection required for Dynamics 365 For Finance and Operations Deploy through Lifecycle Services. First of all, we open our project from Lifecycle Services. Under Environments, we click on Microsoft Azure settings.

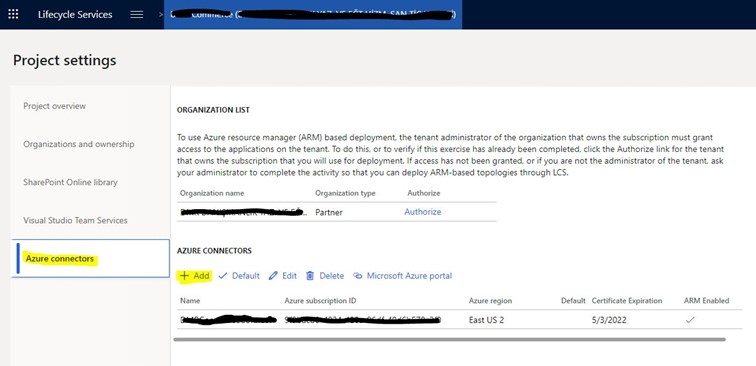
Your Azure Connectors will appear on the Azure connectors tab, if available. It appears on the list because I have a connection for this environment. After completing these steps, when we look, here again, the connection must be established. We can start adding a new link by clicking the + Add button.


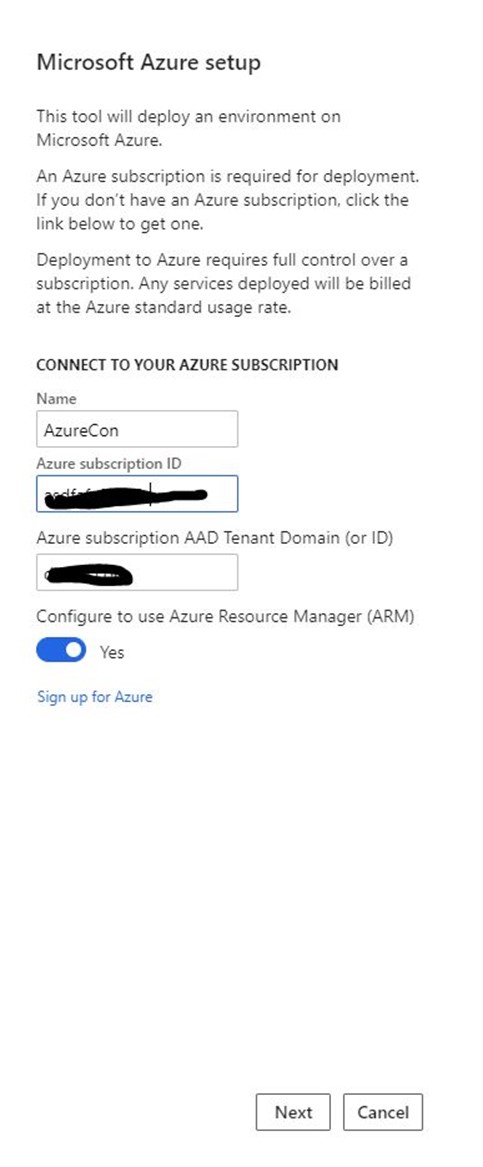
In the window that opens, Name will be the name we provide for the link. Azure subscription ID we want to establish a connection to the section Azure, you must enter the code for the membership. Tenant Domain information will come automatically. You should mark Azure Resource Manager (ARM) as
Yes. We go to the next page with Next.


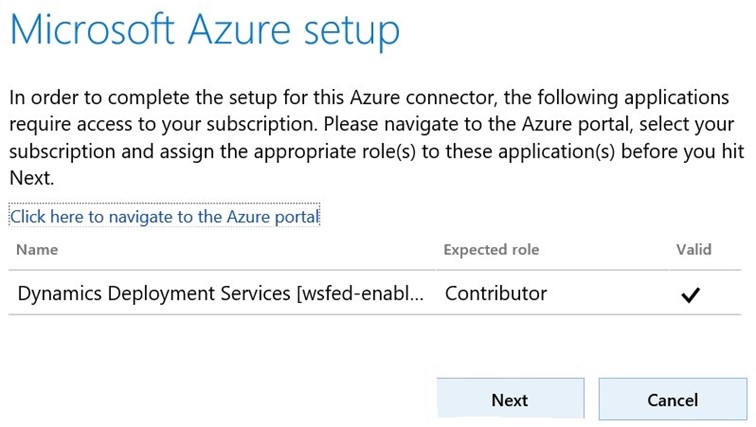
You should have given the Dynamics Deployment Services authorization I mentioned in my previous article before this step. If you have, you will see the screen below. We go to the next page with Next.


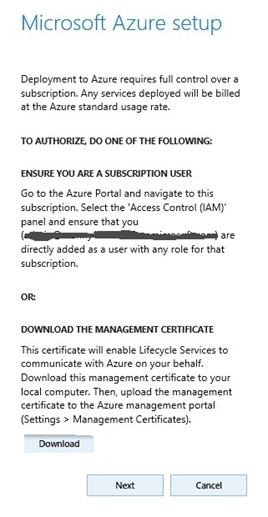
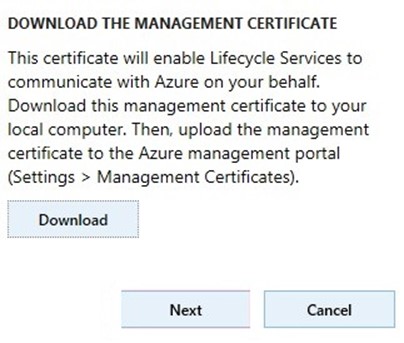
Before continuing, we need to download the Management certificate and install it on the Microsoft Azure Portal. You can leave this page open.


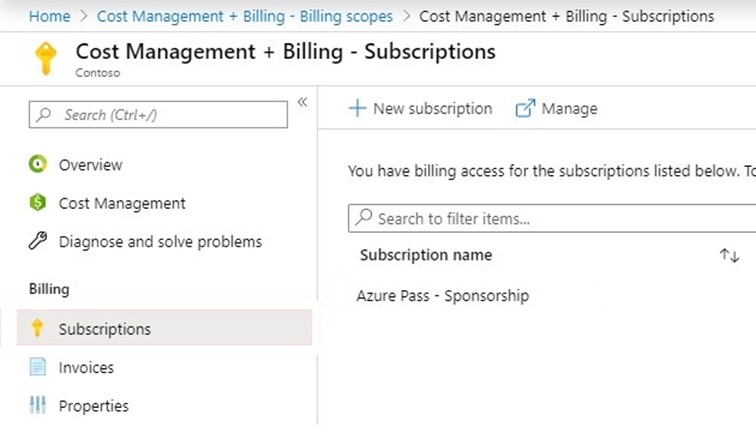
We login to the Azure portal and select the membership you want to connect with.


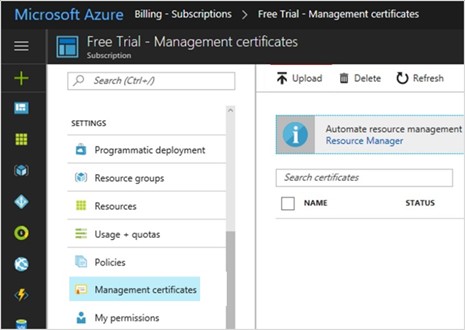
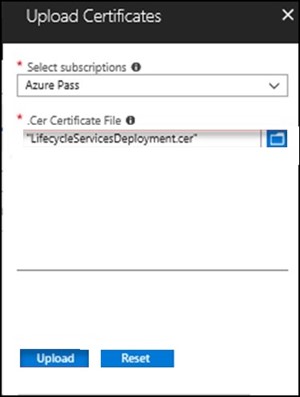
We click on the Management Certificates section and click the Upload button in the window that opens.


We select and upload the certificate we downloaded.


When you see this screen, the installation process is completed.


We can return to the screen we stayed in Lifecycle Services and continue with the Next button. After this stage, we can continue without errors.


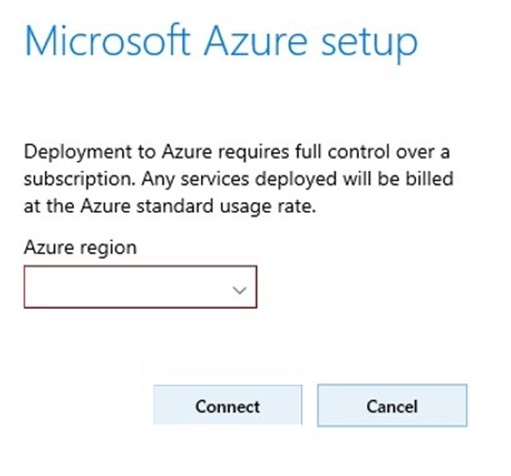
We usually choose West Europe in the Azure region.


After clicking the Connect button, you should see an item in your Azure Connection list as follows. At this stage, the connection has been completed.


In this article, I tried to explain how to set up an Azure connection via Lifecycle ServicesSince Dynamics 365 is a structure that runs on Azure, it is necessary to have information about many Azure subjects.


Electronic reporting by example: Create a new Bank file definition


Thomas Widmer's D365 Blog

Electronic Reporting seems to be an integral part of the future of Dynamics 365 that can be used for importing and exporting data of all kinds above and beyond the capabilities of the static data entities, so it is worth finding out how this works.
In the following we will do this by example.

Online ressources

As a starting point there is standard microsoft documentation and this great blog with detaillied instructions:

High level overview for creation of new Bank file

  1. Extend a preexisting bank format
  2. Define new export format – Constants
  3. Define new export format – Data fields
  4. Add transformations for correct formatting
  5. Add new calculated fields
  6. Calculate total fields
  7. Add user input parameters
  8. Add validations for readable errors
  9. Activate

BACS: 1. Extend a preexisting bank format

It is always easier to start based on preexisting work instead of starting from scratch, so to create a new…

View original post 277 more words